
Connecting rooms, walls, doors and dimensions on the plan to the space itself
Last updated:
Key takeaways:
- A floor plan is a horizontal slice of the building seen from above.
- Walls, openings, and fixtures are drawn to scale with dimensions.
- Room labels, symbols, and notes explain function and finishes.
Of all the drawings in a construction set, the floor plan is the one people read most. It is the map of a building — a view from directly above that shows how rooms, walls, doors, and windows fit together. Learning to read a floor plan step by step gives you a practical grasp of a building’s layout and is the natural starting point for understanding any set of construction documents. This guide walks through exactly how to read a floor plan, from orienting yourself to interpreting the details.
Whether you are planning a renovation, buying a property, or learning the trade, the floor plan is where a building’s design becomes clear.
What a floor plan shows
A floor plan is a horizontal slice through a building, drawn as if the structure were cut about four feet above the floor and you were looking straight down. That cut height is chosen so the drawing captures doors, windows, and countertops while showing the walls in section. The result is a top-down map of a single level, showing the shape and size of every room, the location of walls and openings, and the placement of fixtures and built-in elements.
Each floor of a building has its own plan, so a two-story house has a first-floor plan and a second-floor plan, sometimes plus a basement and roof plan. Reading them together tells the full story of how the building is arranged.
Step 1: Read the title block and orientation
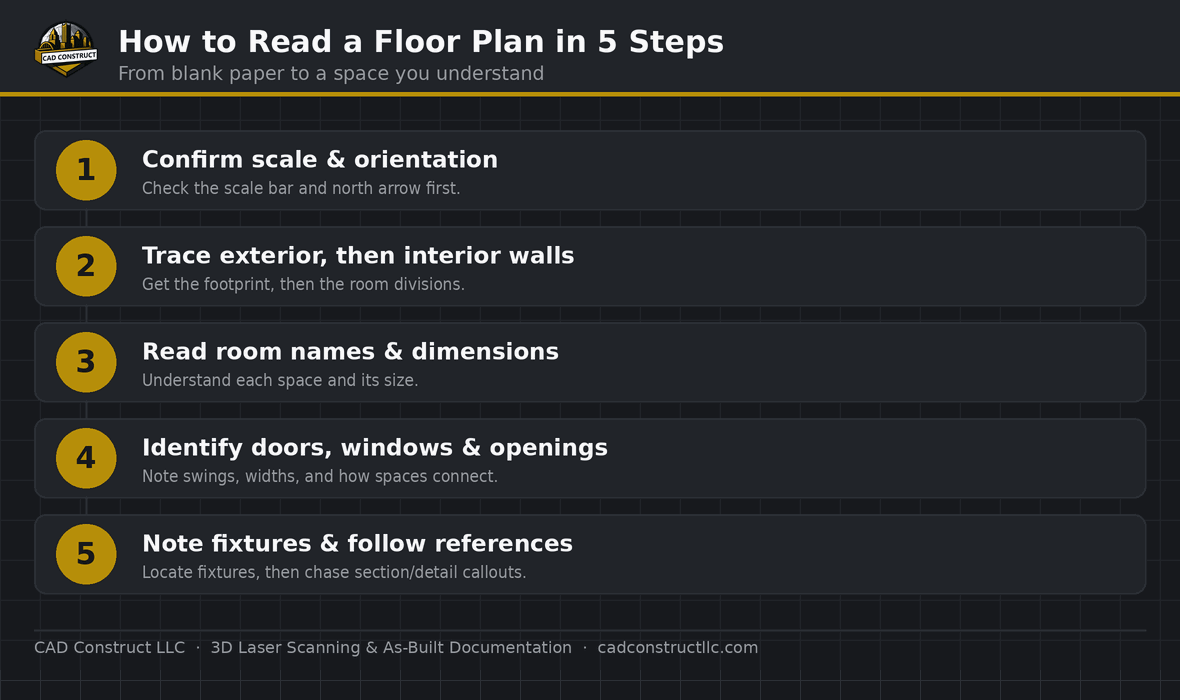
Before studying the layout, read the title block to confirm which floor you are looking at and the drawing’s scale. Then find the north arrow, usually placed near a corner of the sheet, which tells you the building’s orientation. Knowing which way is north helps you understand sun exposure, views, and how the plan relates to the site. Establishing what floor, what scale, and which direction is north takes only a moment and grounds everything that follows.
Step 2: Identify the walls and overall shape
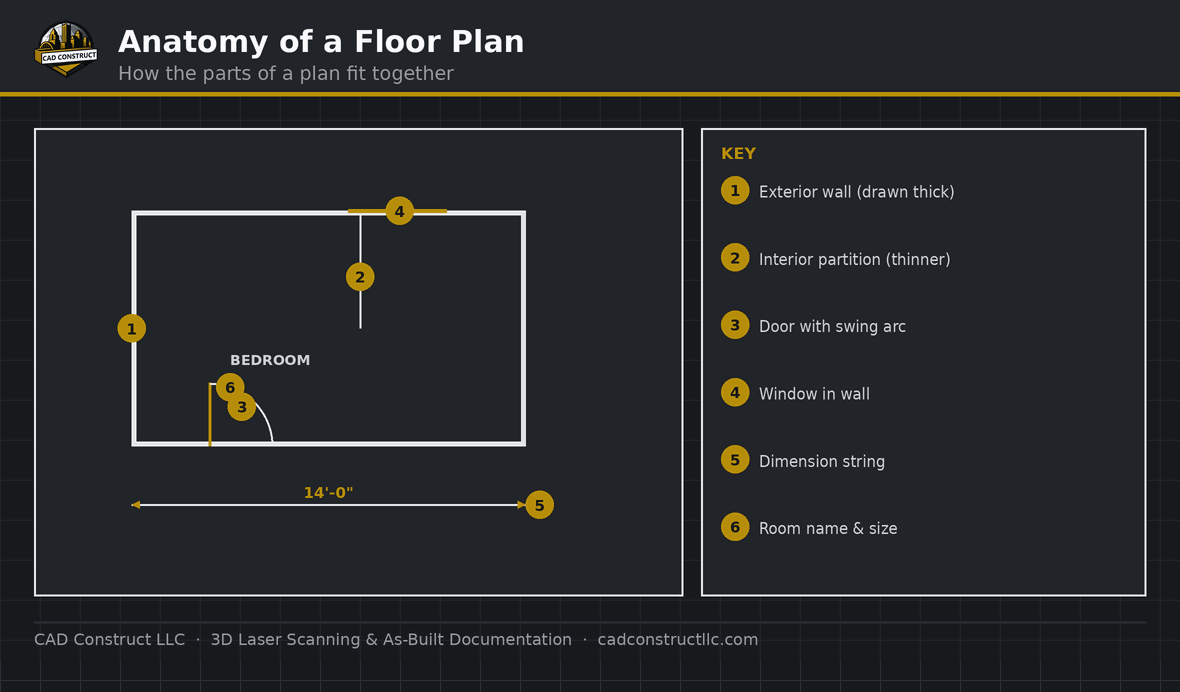
Start by tracing the exterior walls to grasp the building’s overall footprint and shape. Exterior walls are typically drawn thicker than interior partitions. Then follow the interior walls that divide the space into rooms. Walls are shown as parallel lines, and their thickness can indicate whether they are structural, plumbing, or standard partitions. Getting the overall shape and the room divisions clear in your mind gives you the framework for reading everything else.
Step 3: Locate doors and windows

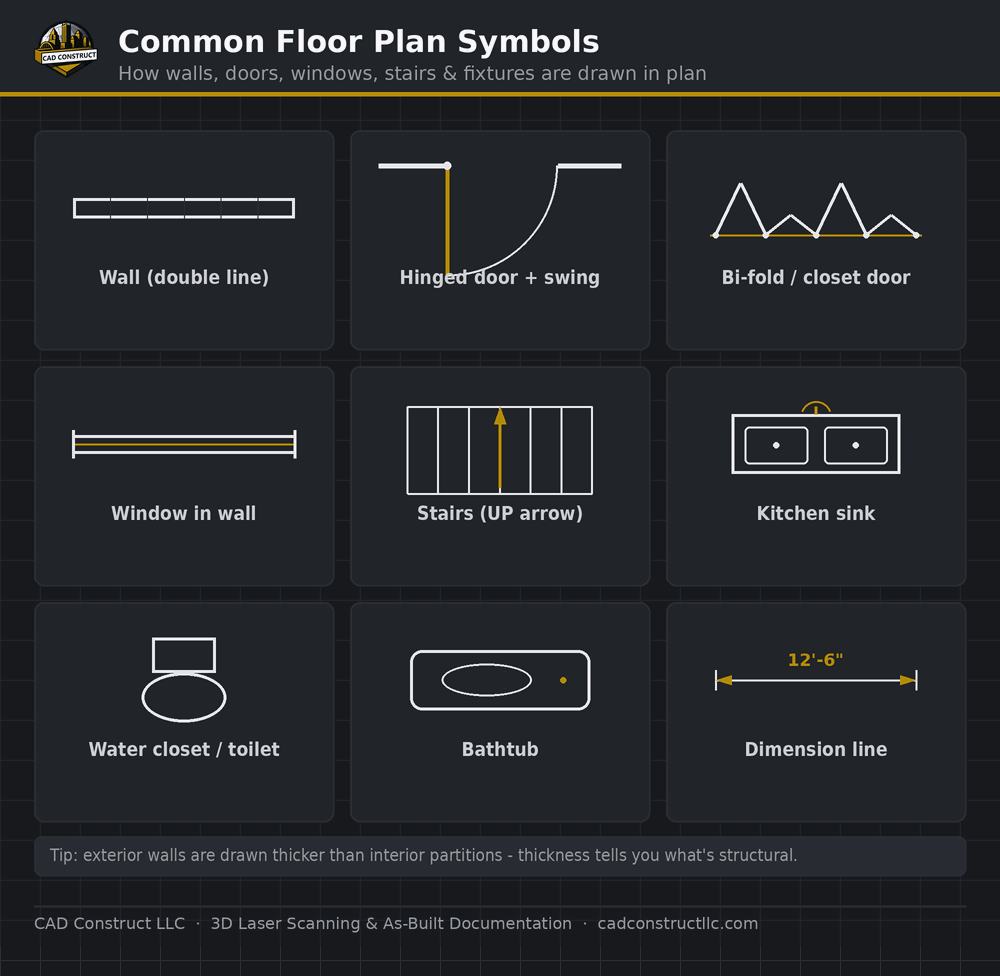
Next, find the doors and windows. Doors are shown as a gap in the wall with a line for the door leaf and an arc showing the swing direction — which way the door opens and into which room. Windows appear as breaks in the wall with thin parallel lines representing the glass. Noting the doors tells you how people move through the space, and the windows show where light and views enter. Together they reveal the circulation and feel of the layout.
Step 4: Read the room labels and dimensions
Floor plans label each room with its name and often its dimensions or area. Dimensions are shown as lines with measurements, running along walls and between features to give exact sizes and locations. Reading the dimension strings — the chains of measurements along an exterior wall, for instance — lets you understand the real size of every space. Where a dimension is not labeled, you can determine it using the drawing’s scale, but most important sizes are called out directly.

Step 5: Interpret fixtures and built-ins
Floor plans show fixtures and built-in elements with standardized symbols: sinks, toilets, tubs, and showers in bathrooms; ranges, refrigerators, and cabinets in kitchens; closets, stairs, and fireplaces throughout. These symbols tell you how each room functions. Stairs are shown as a series of parallel lines with an arrow indicating the direction up, and a note may indicate how many risers connect the floors. Reading these details turns the plan from a set of empty boxes into a fully understood, functional space.
Step 6: Follow the references

Floor plans are connected to the rest of the set through reference symbols. Section markers show where vertical slices are cut and point to the section drawings. Detail callouts direct you to enlarged drawings of specific conditions. Elevation references indicate where interior elevations are taken. Following these references lets you move from the plan to the drawings that explain height, construction, and detail — reading the set as the interconnected whole it is meant to be.
Putting it together
Reading a floor plan well is simply doing these steps in order: confirm the floor, scale, and orientation; trace the walls and overall shape; locate doors and windows; read the room labels and dimensions; interpret the fixtures; and follow the references. With practice, you will do much of this at a glance, absorbing a building’s layout the moment you look at its plan. And when a building’s existing floor plan is missing or no longer accurate, 3D laser scanning and as-built documentation can produce a precise, current floor plan you can trust.

Related blueprint reading guides
- How to Read Construction Blueprints
- How to Read Elevation Drawings
- How to Read Building Section Drawings
- How to Read a Reflected Ceiling Plan
- Understanding Architectural Scale
Related work: See real 2D drawings and CAD deliverables in our CAD portfolio.
Frequently asked questions
Why is the floor plan drawn from above?

A top-down view is the clearest way to show a room layout — the size, shape, and arrangement of spaces, and the location of walls, doors, and windows. It is the most intuitive way to understand how a building is organized on each level.
How do I know which way a door opens?
The arc drawn with the door symbol shows the swing. The straight line is the door leaf, and the arc traces the path it follows as it opens, telling you both the direction and the room it opens into.
What if a dimension is not labeled?
You can determine an unlabeled size using the drawing’s stated scale and a scale ruler, though most important dimensions are labeled directly on the plan so you rarely need to measure.
The floor plan is the map of a building, and reading it is a step-by-step skill anyone can learn. Orient yourself, trace the walls, find the openings, read the dimensions and fixtures, and follow the references — and any floor plan becomes a clear picture of how a building is arranged.
Can I get a floor plan of a building that has no drawings?

Yes. When original drawings are lost or a building has been modified over the years, a measured survey can produce an accurate current floor plan. Laser scanning captures the space precisely, and the resulting as-built plan reflects the building exactly as it exists today rather than as it may once have been designed.
What does a floor plan show?
The arrangement of rooms, walls, doors, windows, stairs, and fixed elements on one level, drawn to scale as seen from above.
At what height is a floor plan cut?
Conventionally about four feet above the floor, so doors, windows, and counters appear while taller elements above are shown dashed.
How do I find a room’s dimensions on a plan?

Read the dimension strings along the walls or the noted room sizes, and use the drawing scale only as a backup.
What do the small arcs at doors mean?
They show the door swing — which way the door opens and the path it travels.
How are stairs shown on a floor plan?
As a series of parallel lines representing treads, with an arrow indicating whether they go up or down from that level.
What counts as a fixture on a floor plan?
A permanently installed item such as a sink, toilet, tub, or built-in cabinet, each drawn with a standard symbol.
Related blueprint reading guides
- USIBD Level of Accuracy (LOA), explained
- How to Read Construction Blueprints — full guide
- How to Read Elevation Drawings
- How to Read Building Section Drawings
- How to Read Electrical Plans & Symbols
- How to Read Plumbing Blueprints
- Blueprints vs. 3D Models & BIM
Turning these drawings into a field-verified digital record? See our scan-to-BIM services and as-built documentation across Pittsburgh & Western PA, or request a quote.


0 Comments